Project Information

This project is a comprehensive gaming portal built using Laravel 11, designed to provide users with a seamless experience for discovering, playing, and interacting with a variety of online games. The platform offers a user-friendly interface with a wide range of features aimed at both casual and dedicated gamers. Key functionalities include user profiles, game categories, advertisements, and a dynamic content system that updates regularly.
Key Features:
- Multi Language Feature, use your own language and Add translation into your database.
- Automatic and manual translation feature available so you can use it as your own.
- Multi Theme: this project available with the multiple themes and all the themes are unlocked.
- Game Library: A large collection of games organized into different categories for easy browsing.
- User Profiles: Registered users can create and customize their profiles, track their favorite games, and save their progress.
- Categories and Filters: Games are sorted into different genres and categories, with filters to help users quickly find games that interest them.
- Advertisements: Integrated advertisement management that allows the display of banners, videos, and other ad formats to monetize the portal.
- Admin Panel: A powerful backend system where administrators can manage games, categories, user accounts, content updates, and advertisements.
- Mobile Application: The gaming portal is complemented by a mobile application, providing the same rich experience on mobile devices. The app is built with a user-centric design, allowing easy navigation and smooth gameplay on the go.
- Responsive Design: The portal is optimized for both desktop and mobile, ensuring a smooth experience across devices.
Installation on Cpanel or Hosting Account
Follow these steps to install the project on a Cpanel or hosting account:
- Login to your Cpanel or hosting account.
- Upload the project files via the File Manager or FTP.
- And ensure that all the files those are shown in the below image are available

Uploading Database File
After uploading the project files, follow these steps to upload the database:
- Navigate to the Cpanel and open phpMyAdmin.
- Create a new database.
- Import the SQL file
game_portal.sqlLocated in the zip file which you downloaded and import all the data in the database.

Providing Permissions
After installation, ensure the following folders have the correct write permissions:
storagepublic/images/games/iconspublic/images/games/bannerpublic/images/adspublic/images/categoriespublic/images/faviconspublic/images/logospublic/images/pagespublic/images/postspublic/images/user
Run the following command if you have SSH access to set the correct permissions:
chmod -R 775 storage public/imagesEdit .env File
After uploading the project, edit the .env file to configure the environment settings, such as database credentials and application key:
                DB_CONNECTION=mysql
                DB_HOST=127.0.0.1
                DB_PORT=3306
                DB_DATABASE=your_database
                DB_USERNAME=your_username
                DB_PASSWORD=your_password
                DEMO_MODE = off

                APP_URL=https://yourdomain.com
Server Requirements
Ensure your server meets the following requirements:
- PHP 8.2 or higher
- MySQL 5.7 or higher
- Composer installed
- Apache or Nginx
Configuration
Once the project is installed, you can configure additional settings by editing the configuration files in the config directory. For example, to configure the mail settings, edit the config/mail.php file.
Troubleshooting
If you encounter any issues during the installation or setup process, here are some common troubleshooting steps:
- Ensure all required PHP extensions are installed (e.g.,
mbstring,openssl,pdo). - Check file permissions for the
storageandbootstrap/cachedirectories. - Review the server logs for any error messages.
Basic Settings
Before making your website for public use you need to setup these important features on your website. you need to login into admin panel by using the following credentials.Email: admin@demo.com
Password: 123456789
Global Settings
In the global settings which is available under website settings menu in the Admin Panel you can setup the required and basic information about your website like Name, Logo, Descriptions, tags, SEO Settings, ads.txt file setup, Google Analytics, Social Link setup and Social login Setup to enter your social network APIs.Languages
As you know this is a multi lingual website project so you can add multiple languages and use all of them into your website. Go to the Website Settings menu and then click on Languages to see or add yor own language. This project also include a Automatic translation so you can use the translation service for free.Feature Activation
By Using this menu you can enable or disable the features like HTTPS Activation, Maintenance mode, Disable image encoding feature etc. you can also be able to manage your social login feature by using this menu which is available under website settings.Mobile App Setup
There will be a Flutter app code so you make your mobile application for iOS and Android. This is so simple to generate your own application by using Flutter SDK.Requirements
There will be some requirements to publish your app.- Download Flutter Latest SDK by using this link Download Flutter SDK
- Download Android studio from it's official website Download Android Studio
- Or if you prefer to use vscode then you can download this from here Download VSCode
D:\src\flutter\bin
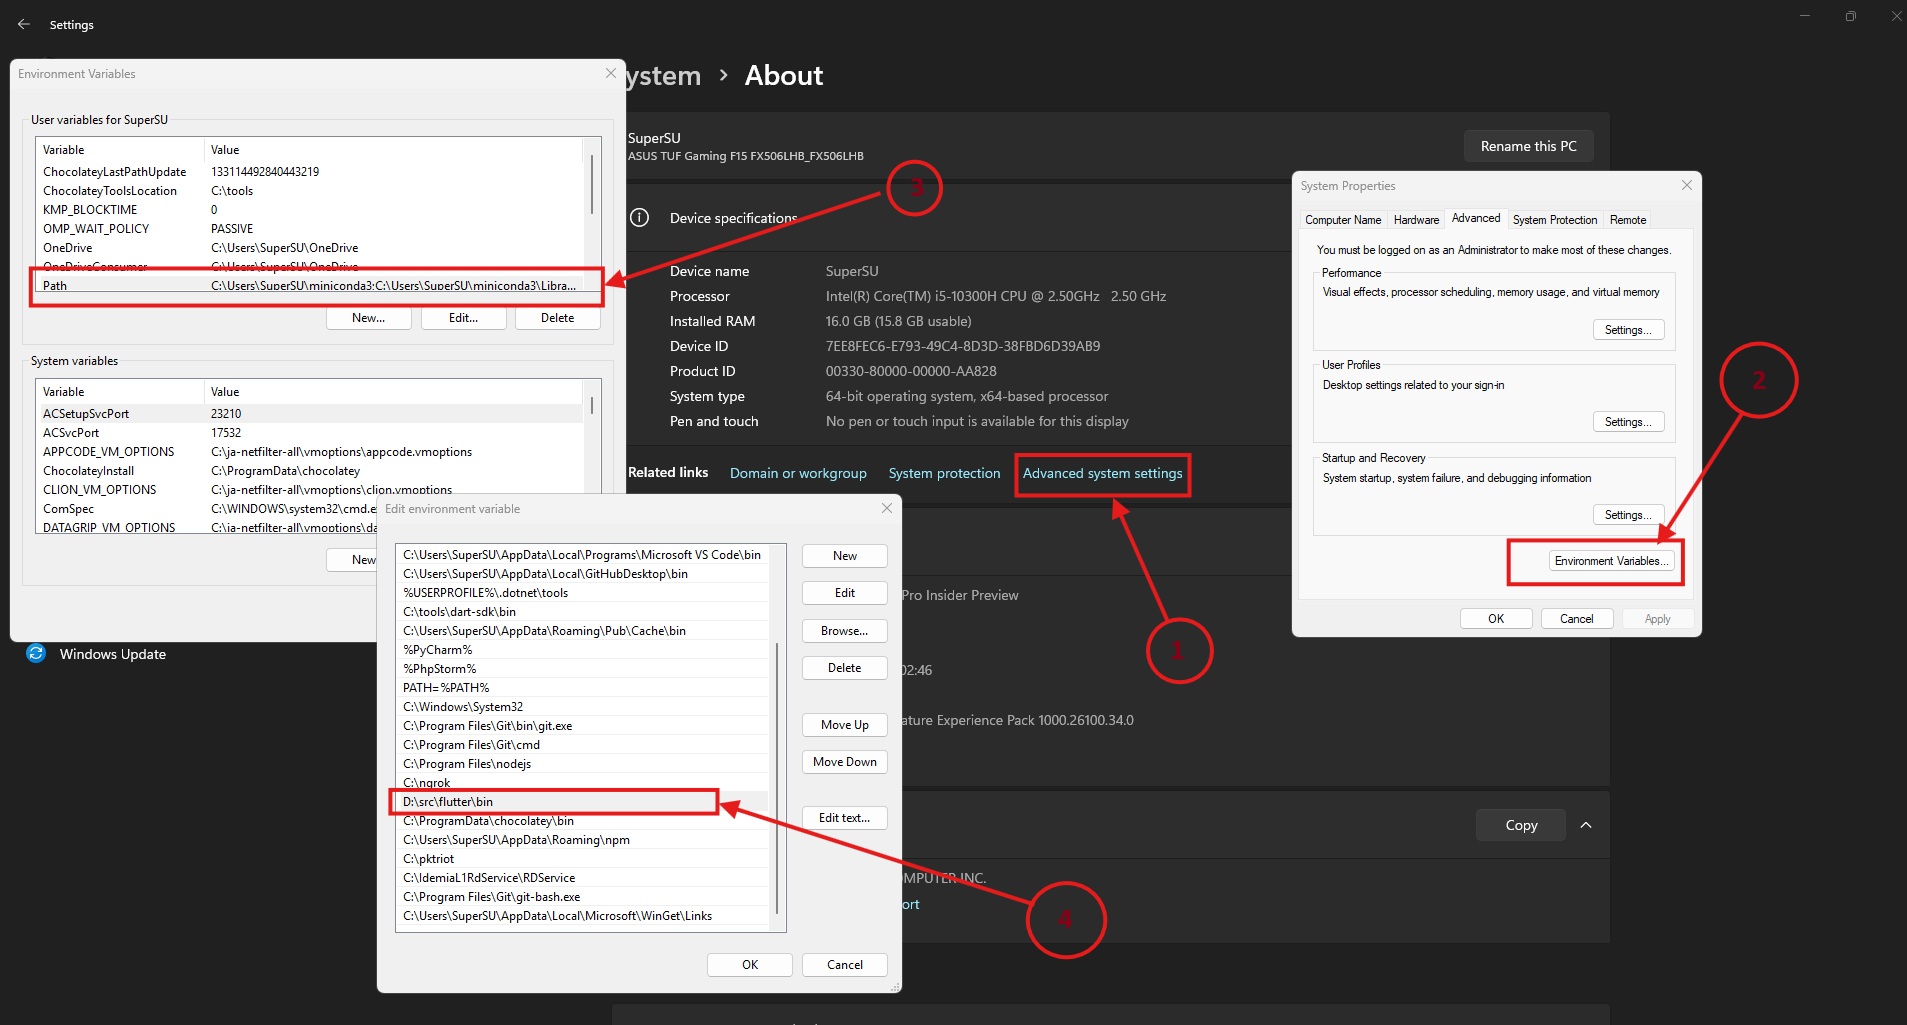 Now click on Ok then click on OK and then click on Apply button to make changes.
Type the following command into your CMD or Terminal to check the flutter was installed successfully or not.
Now click on Ok then click on OK and then click on Apply button to make changes.
Type the following command into your CMD or Terminal to check the flutter was installed successfully or not.
flutter --version
You will get the response like this.
                Flutter 3.24.2 • channel stable • https://github.com/flutter/flutter.git
                Framework • revision 4cf269e36d (3 months ago) • 2024-09-03 14:30:00 -0700
                Engine • revision a6bd3f1de1
                Tools • Dart 3.5.2 • DevTools 2.37.2
Lauching the app on your device
To use this app on your Android or iOS device, you need to first enable usb debugging on your device and connect to the pc then type the following commands.
                cd gaming_zone_app
                flutter pub get
                flutter run
The app will start working on your device.
Setting Up API and Changing the Package Name
Open or import the gaming_zone_app directory into any software tool we prefer to use Android Studio. for changing and building the app follow the bellow stepsNavigate to the android/app directory in your Flutter project.
-
Update the
applicationIdinbuild.gradle:- Open
android/app/build.gradle. - Locate the
applicationIdfield inside thedefaultConfigblock. - Change the value to your desired package name.
- Open
                defaultConfig {
                    applicationId "com.new.package.name"
                     ...
                }
Update the package structure:
- In the
android/app/src/main/javafolder, the subdirectories represent the package name. - Rename these directories to match your new package name (e.g.,
com.example.app→com.new.package.name). - Update the package declaration in all
.javaor.ktfiles under the new structure. For example:
package com.new.package.name;
Update in AndroidManifest.xml:
- Open
android/app/src/main/AndroidManifest.xml. - Update the
packageattribute in the<manifest>tag:
- Open Xcode:
- Navigate to the
ios/Runner.xcodeprojdirectory and open it in Xcode.
- Navigate to the
- Update the Bundle Identifier:
- Select the
Runnerproject in the Project Navigator. - Go to the "General" tab.
- Under "Identity," update the "Bundle Identifier" to your new package ID (e.g.,
com.new.package.name).
- Select the
- Update the
Info.plistfile:- Open
ios/Runner/Info.plist. - Ensure the
CFBundleIdentifierkey matches your new bundle identifier.
- Open
Step 3: Update Dart Package References
- Update the Dart files:
- Search for occurrences of the old package name in your Flutter project's Dart files, especially in files where you use
package_info_plusor similar plugins. Update them to reflect the new package name.
- Search for occurrences of the old package name in your Flutter project's Dart files, especially in files where you use
- Check the dependencies:
- Ensure third-party services (like Firebase or Google APIs) are configured for your new package ID.
Setting the API In the flutter App
Open your app in the Android Studio then visit the lib>services directory and open the api_service.dart file here you need to paste your website before /api please check the below screenshot.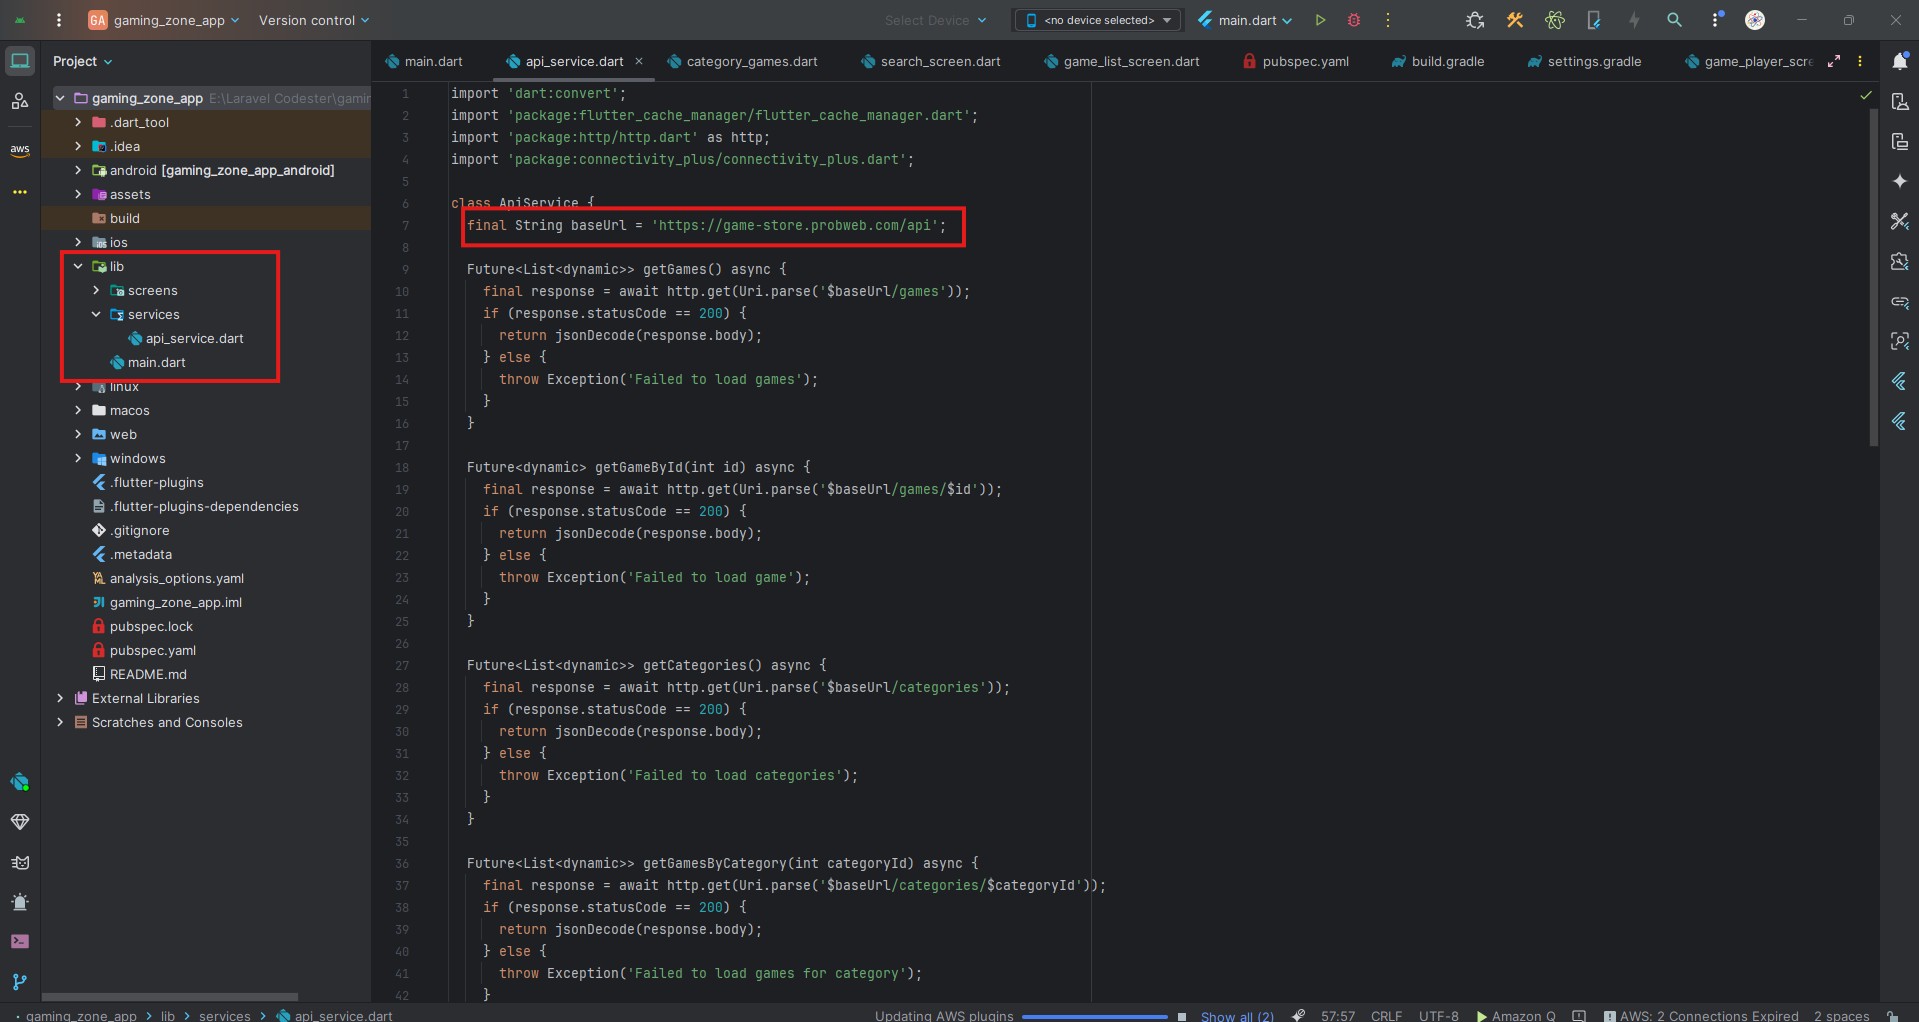
Step 4: Clean and Rebuild
- Run the following commands to clean and rebuild your project:
                flutter clean
                flutter pub get
                flutter build apk
                flutter build ios
Step 5: Verify Changes
- Test the app thoroughly on both Android and iOS.
- Update related configurations (like Firebase or push notification services) to use the new package ID.